Practicing yoga is often one of the best gifts we can give our bodies — it can improve balance, flexibility, relaxation and overall well-being. More specifically, yoga practice has shown serious promise as it pertains to alleviating chronic neck pain.
Spread out your mat, grab some water and let’s put some of the best yoga poses for neck pain and shoulder discomfort into practice, including:
- Warrior II
- Two-Footed
- Standing Forward Bend
- Thread the Needle
- Cobra
- Melting Heart
#1 Warrior II
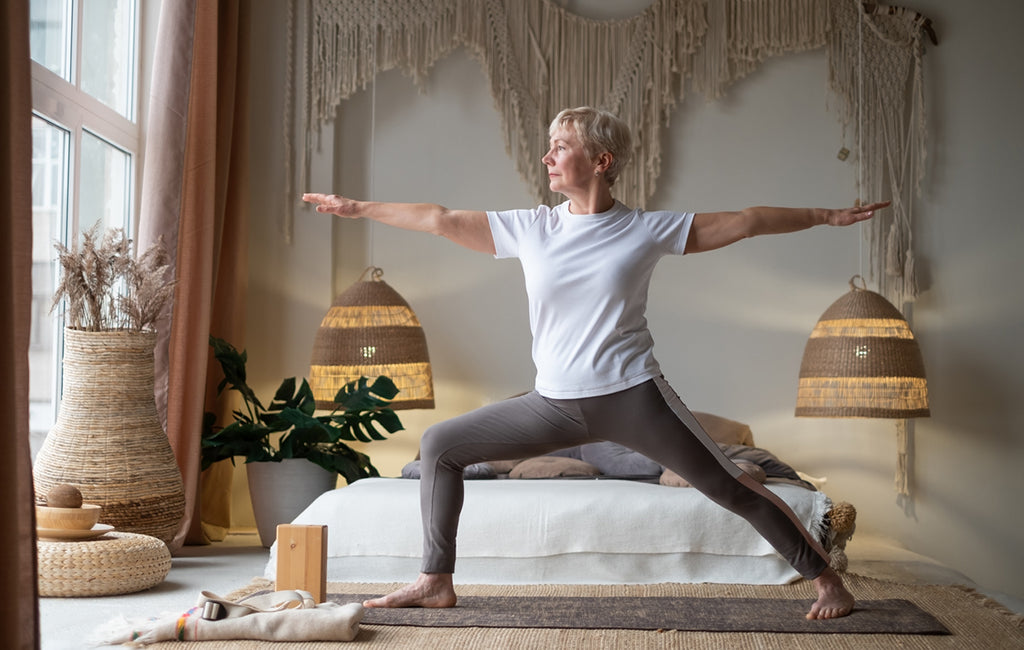
Despite the strength of its name, Warrior II encourages a soft neck and relaxed shoulders. While your legs stay firmly planted, your goal for your upper body should be alignment, elongation and relaxation. By encouraging core strength and healthy spinal alignment, this is one of the best remedies to stiffness and soreness typical of poor posture. When it comes to yoga for stiff neck pain, Warrior II is an effective pose to practice.
Here’s how to reap the benefits of this staple pose:
- Start in an upright standing position at the front of your yoga mat. Both feet should face forward, about hip width apart.
- Step one foot back, perpendicular to your front foot. The inside of your arch should rest gently against the mat so that your foot is angled slightly.
- Bend your front knee with your weight primarily over that front leg. Your back leg should be straight.
- Reach one arm forward and the other back and then use the same upper arm and leg so that your shoulders and hips are both open rather than twisting against each other. Spread out your full wingspan and elongate through the fingertips while keeping your shoulders relaxed.
- Breathe into this position for 30 seconds. Return to neutral, and repeat on the other side.
#2 Two-Footed
This simple yoga pose bears resemblance to the popular exercise known as the glute bridge. The mechanics are nearly identical, although the intention of the two-footed pose is to release spinal tension and relax the stiff neck and tight shoulders, not to build glute muscles.
Lay on your back and follow these straightforward steps to achieve the intended results for this neck and shoulder stretch:
- Bend your knees so that your feet lay flat on your mat, in line with your hips and knees. There should be a few inches between your heels and hamstrings.
- Inhale as you press your feet into the mat, engaging your leg muscles. Lift your pelvis off the mat into a relatively straight line from your knees to your chest. Your chin should stay tucked and you should feel the base of your neck in contact with the mat beneath you.
- Exhale and lower your pelvis back to the floor, rolling slowly through each vertebra on your way down.
- Repeat eight to ten times.
Rolling through the spine should release some of the tension between your vertebrae and encourage a freer, more healthy alignment when sitting or standing. This, in turn, should have a positive effect on any neck pain that comes from improper alignment.
#3 Standing Forward Bend
This standard yoga pose also resembles a ubiquitous stretch and it’s typically referred to simply as a hamstring stretch or toe-touch. Once again, this forward fold focuses more on releasing and stretching out the spine than the hamstrings, although you may feel a slight pull in the back of your legs as well.
Gravity does most of the work during this simple exercise:
- Stand with your feet hip width apart, toes facing forward on your mat.
- Drop your chin and tuck it against your chest as you roll down through your spine, until your hands are close to the floor. Bend your knees slightly.
- Let gravity work its magic as you release your spine, neck and shoulders. Try not to hold any tension in your neck at all.
- Hold for about a minute, then roll up through your spine to stand.
Optional Add-Ons: Shoulder Opener or Neck Stretch
There are two easy ways to enhance the effects of this pose:
- Shoulder Opener – Before bending forward, clasp your hands behind your back. As you roll down through your spine, let your arms fall towards the ground. You should feel a stretch through the front of your shoulders, opening them up as you breathe into this pose.
- Neck Stretch – While in forward bend, place your hands behind your head at the base of your skull, fingers intertwined. Don’t push or pull — instead, simply allow the extra weight of your hands to amplify the stretch in your neck.
#4 Thread the Needle
This pose releases tension through a gentle spinal twist. Most yoga for neck and shoulders aims to enhance mobility, thereby relieving some of the tightness at the root of your discomfort.
Here’s how to thread the needle effectively:
- Start on all fours. For proper alignment, your hands should be underneath your shoulders and your knees beneath your hips.
- Think of your right arm as the thread and the space between your left arm and left thigh as the eye of the needle. Slide your right arm against the floor through the opening and lower your right shoulder and right cheek to the ground.
- Breathe deeply into this mobilization pose for about 30 seconds.
- Return to neutral, sit into Child’s Pose for another 10 seconds, then thread the needle through the other side.
#5 Cobra
While Cobra Pose can provide serious relief from neck pain, it can also create problems of its own when practiced incorrectly. If you’re trying this for the first time at home, pay careful attention to the steps involved as well as our alignment dos and don’ts. Also, ease off at the first hint of increased pain.
Here are the basic steps:
- Lie facedown on your yoga mat with your legs straight out behind you, tops of your feet touching the floor, elbows tucked by your sides and hands planted underneath your shoulders.
- Inhale as you straighten your arms, lifting your upper body off the floor as your feet. Your legs and pelvis should remain firmly pressed into the ground.
- Hold for 15 to 30 seconds, then slowly lower yourself back down to neutral.
This pose sounds simple enough. Mechanically, it is. Posturally, there are several misalignments that could cause more harm than good.
To reap the full benefits of Cobra Pose, ensure that your positioning checks all of these boxes:
- Your pubis bone should remain in contact with the floor the entire time — if you feel it lift, you’ve pushed up too far.
- Lead with your collarbones (or sternum), not your chin. Your head and neck should always be in line with the top of your spine — don’t throw your head back and crunch your neck but don’t tuck your chin all the way to your chest, either.
- Think about extending upwards through the top of your head as a means of elongating (not crunching) the vertebrae of your spine.
- Try to avoid tightening your glutes as you push your hips forward gently. This could cause lower back pain.
#6 Melting Heart
This advanced pose combines a rather intense stretch with a deep opening and relaxation of the joints and muscles — a great release for your neck and shoulders, but also for your hips and lower back too.
If you’re still working towards flexibility and hip mobility, you may want to skip this pose or modify it to better suit your body:
- Start on all fours with your toes tucked under.
- Without altering the alignment of your lower body (hips should remain directly above your knees), walk your arms forward until your forehead is touching the mat with your arms straight out in front of you, armpits as close to the ground as possible. There should be a gentle curve through your mid to lower back.
- Breathe into this posture for as long as five minutes. If you begin to feel pain or discomfort rather than a gentle opening sensation through the front of your body, ease out of the stretch slowly by moving your hands in towards your body and lifting yourself up and back onto all fours.
One potential modification is to bend your elbows and rest your forehead on your hands. This slight elevation should give you the same feeling of openness and release with a bit less intensity.
Yoga For Neck Pain Routine
The neck and shoulders are heavily impacted by tension carried throughout the upper body. Regularly practicing yoga for neck and shoulder pain should begin to ease some of your recurring discomfort by promoting better posture and spinal alignment.
To enhance the benefits of your favorite yoga postures, create a healthy, holistic routine:
- Use a heating pad – Before your warmup, consider manually warming upyour muscles with a heating pad or even a hot shower. Apply the heat pack to your neck and shoulders for about ten minutes to loosen up tight muscles and cold joints, especially if you’re dealing with chronic pain.
- Perform a thorough warmup routine – You should always warm up before practicing yoga, or any activity for that matter. However, you should spend extra time and attention on your neck and shoulders. Right after removing the heat pad, roll your neck slowly, stretch the sides of your neck by gently pulling your head towards each shoulder with the opposite hand and roll your shoulders backward and forward for full mobility.
- Apply a topical CBD cream – Before (or after) practicing yoga, apply a thin layer of topical CBD, whether as a cream, CBD oil roll-on, or rub. CBD balms for muscle and joint relief may be able to reduce any post exercise-induced inflammation, general bodily discomfort and tightness throughout the upper body. You should be able to stretch your muscles and release joint tension more fully and easily.
Zebra CBD For Joints, Muscles and More
The right relaxing yoga poses can do wonders for your neck and shoulder discomfort and topical CBD can be the added boost you need to breathe deeper into each pose or simply breathe easier each day. Live a life where you can lean into, not steer clear of, the things that keep you happy and healthy.
Here at Zebra CBD, our CBD products are formulated to support your well-being and wellness goals. If you’re looking for a complement to your yoga, consider using CBD oil to soothe discomfort and release tension.
We hope this guide helps you achieve that much-needed relief!
Source:
Stanford Medicine. Ice pack or heating pad? What works best for athletic injuries. https://scopeblog.stanford.edu/2020/05/08/ice-pack-or-heating-pad-what-works-best-for-athletic-injuries/

